Live Stage
Learn how to set up live streams and create Live Stages to broadcast your virtual sessions to larger audiences and increase your reach
Contents
|
2.1. Live Stage with an Embedded Live Stream → 2.2. Live Stage with External Video Conferencing or Streaming Provider → 2.3. Live Streaming with Zoom → 3. Chat Panel → |
Introduction
A Live Stage is a page on the event website where participants can watch a live stream and interact with each other via chat. It is used to broadcast sessions to large audiences in real time.
You should consider live streaming sessions that have the purpose of presenting information and do not require direct participant interaction, such as presentations, speeches, keynotes, etc.
For large audiences, live streams are more suitable than video conferencing, since they reduce the risk of interruptions and prevent potential bandwidth issues.
For interactive sessions with a reduced number of participants (webinars, workshops, pitches, etc.) you can use our integrated video conferencing solution.
Setting up a Live Stream
To set up a live stream, you first need to define a location by going to Agenda > Locations.

Click the Add Location button in the upper right corner. Enter the name of your live stream and enable the toggle button.

There are two types of Live Stages you can create:
- a Live Stage with an embedded live stream from an external video hosting website or streaming platform, such as YouTube, Vimeo, or Twitch

- a Live Stage with a live stream from an external video conferencing tool such as Zoom, Webex, or GoToWebinar, or an external streaming provider such as Restream

Live Stage with an Embedded Live Stream
To simply show an existing stream on your b2match event, select the "Embed Code" option and paste the embed code into the field below.

Depending on the video or streaming platform, the embed code will vary. You can find instructions on how to get an embed code below:
Once you paste your embed code, click the "Create" button in the lower left corner and your Live Stage will be created. You will be redirected back to the "Locations" main screen, where you will have an overview of all the Locations you have created so far.

Click the "Join Online" button to go to the Live Stage.
The "Join Online" button allows you to access the Live Stage even if the participants don't have access to it yet.

A Live Stage with an embedded video can also be used for regular videos that are not live streams. You can use the Live Stage for prerecorded sessions, provided that the videos have been uploaded on a video hosting website such as YouTube or Vimeo.
Live Stage with External Video Conferencing or Streaming Provider
To stream an online session hosted on an external videoconferencing tool or a streaming provider, select the "Live stream (RTMP)" option.

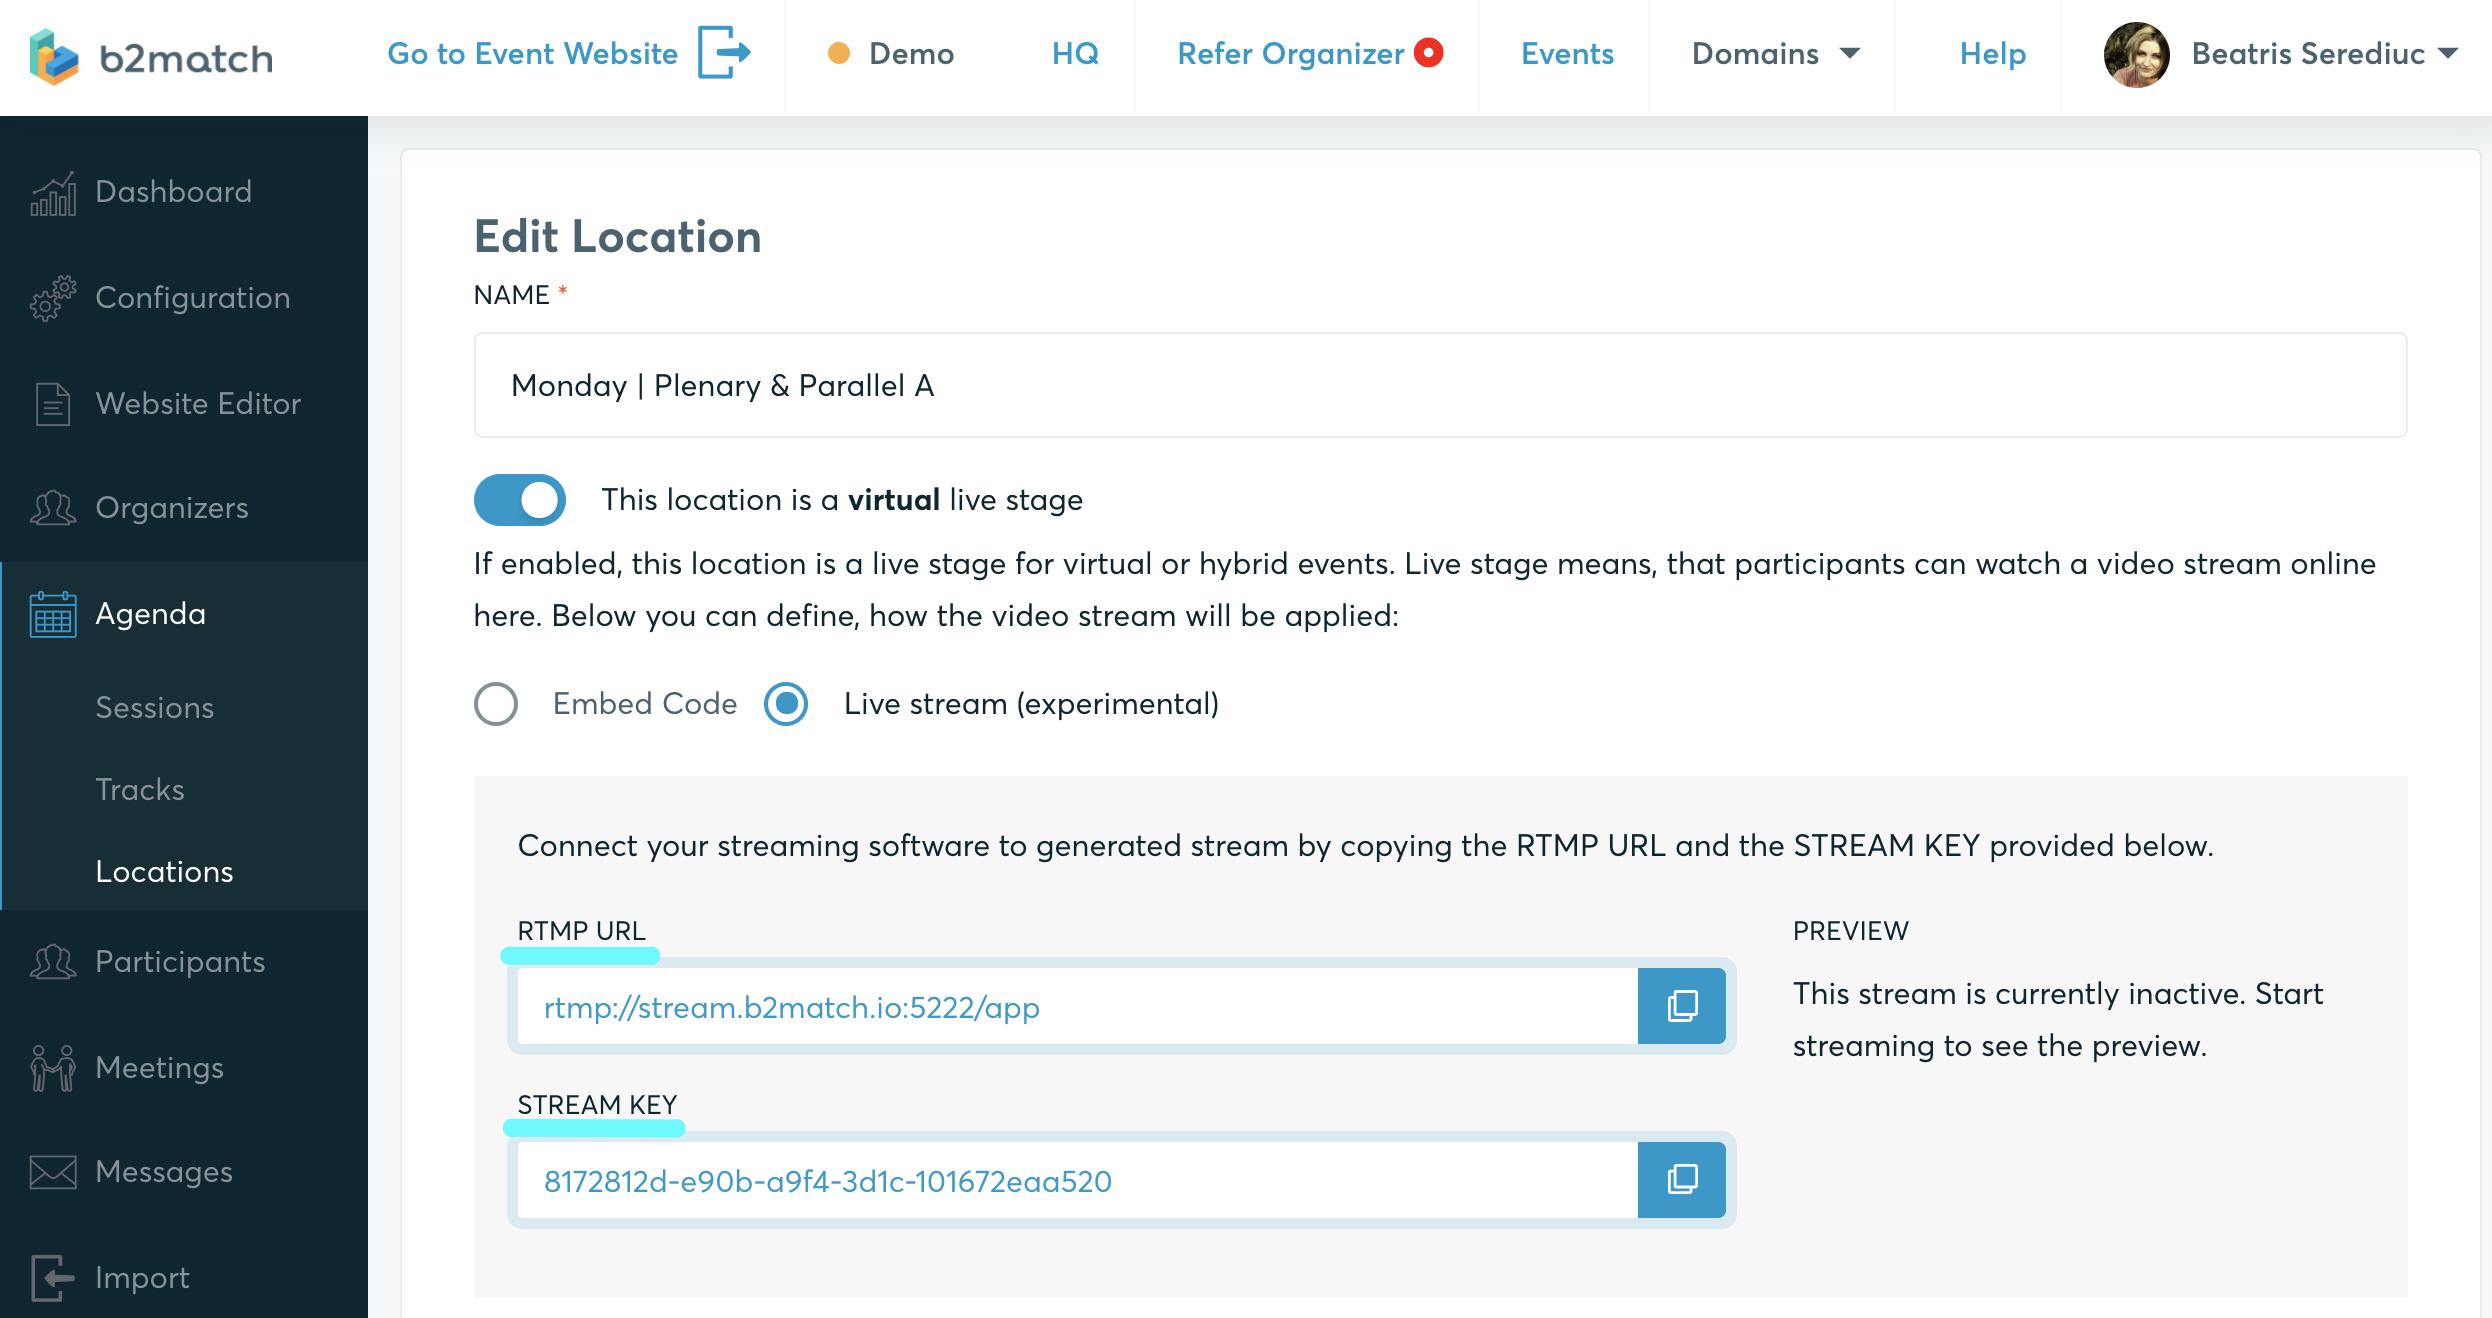
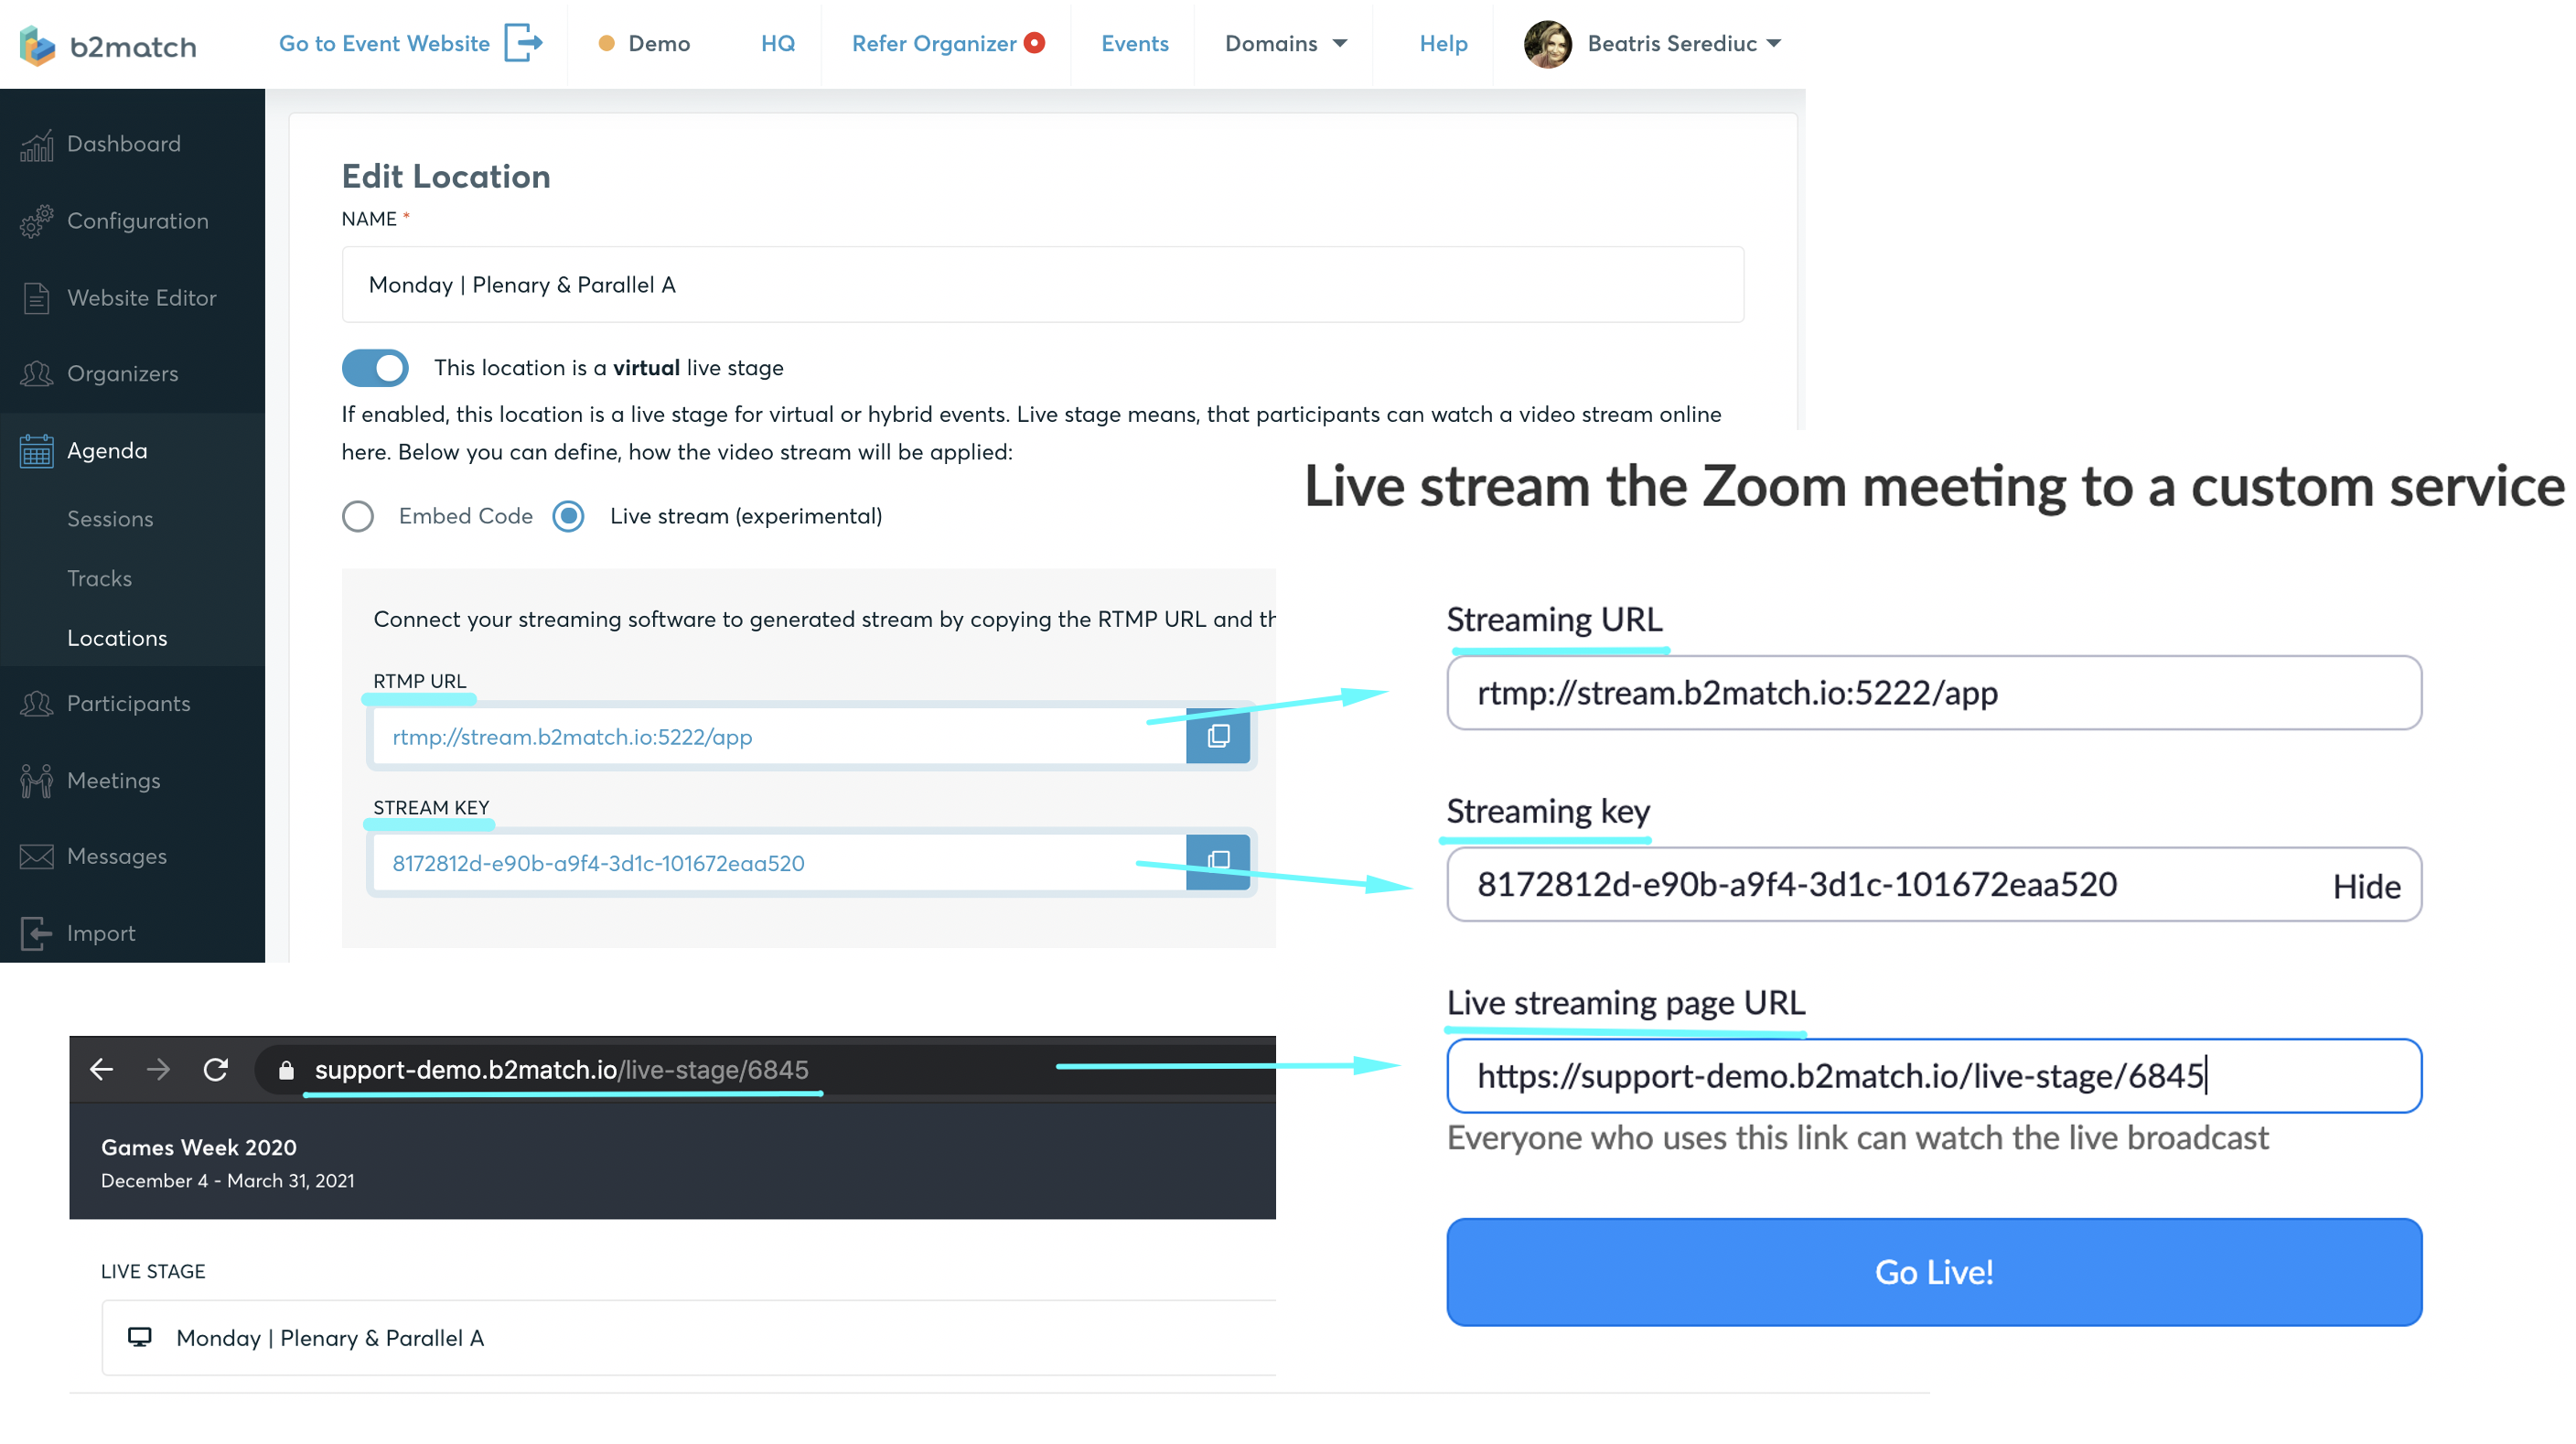
Click the "Create Stream" button, and it will generate a RTMP URL and Stream Key which you will need to connect your video conferencing tool or streaming provider with b2match.

Click the "Create" button in the lower left corner and your Live Stage will be created.

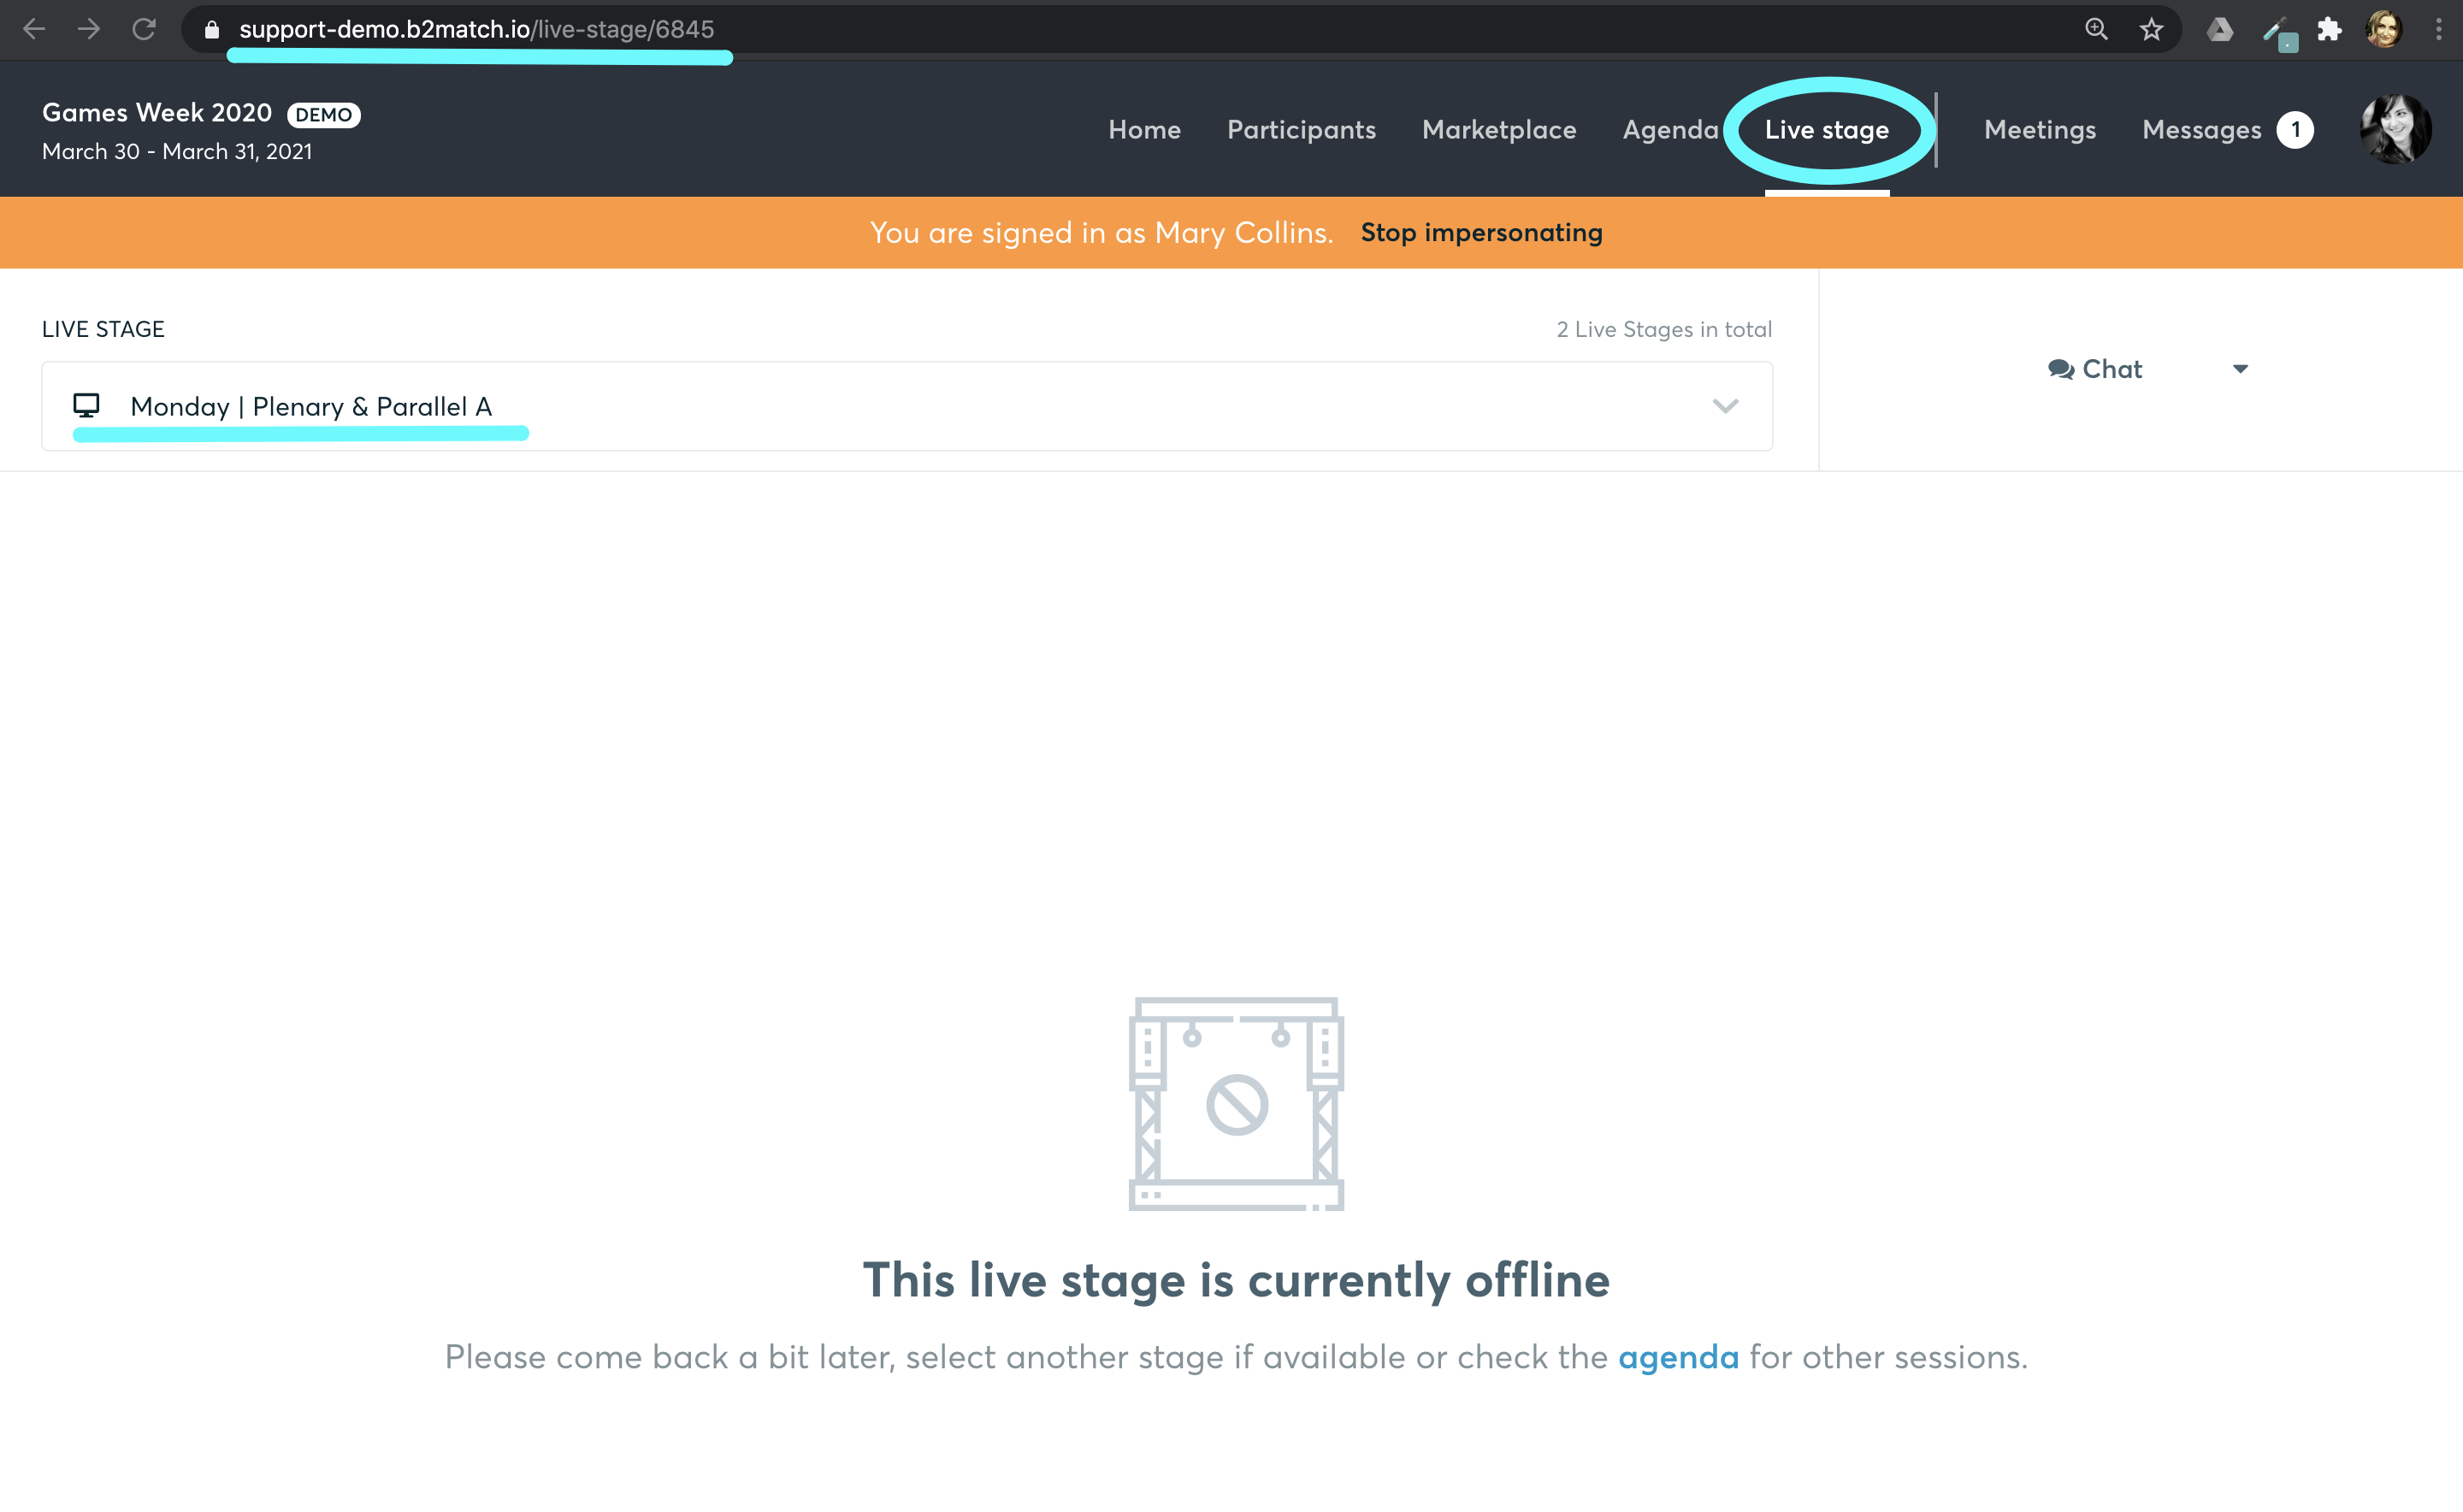
The "Streaming halted" label indicates that no live streams have been started yet. If participants have access to the live stage, they will see the following screen:
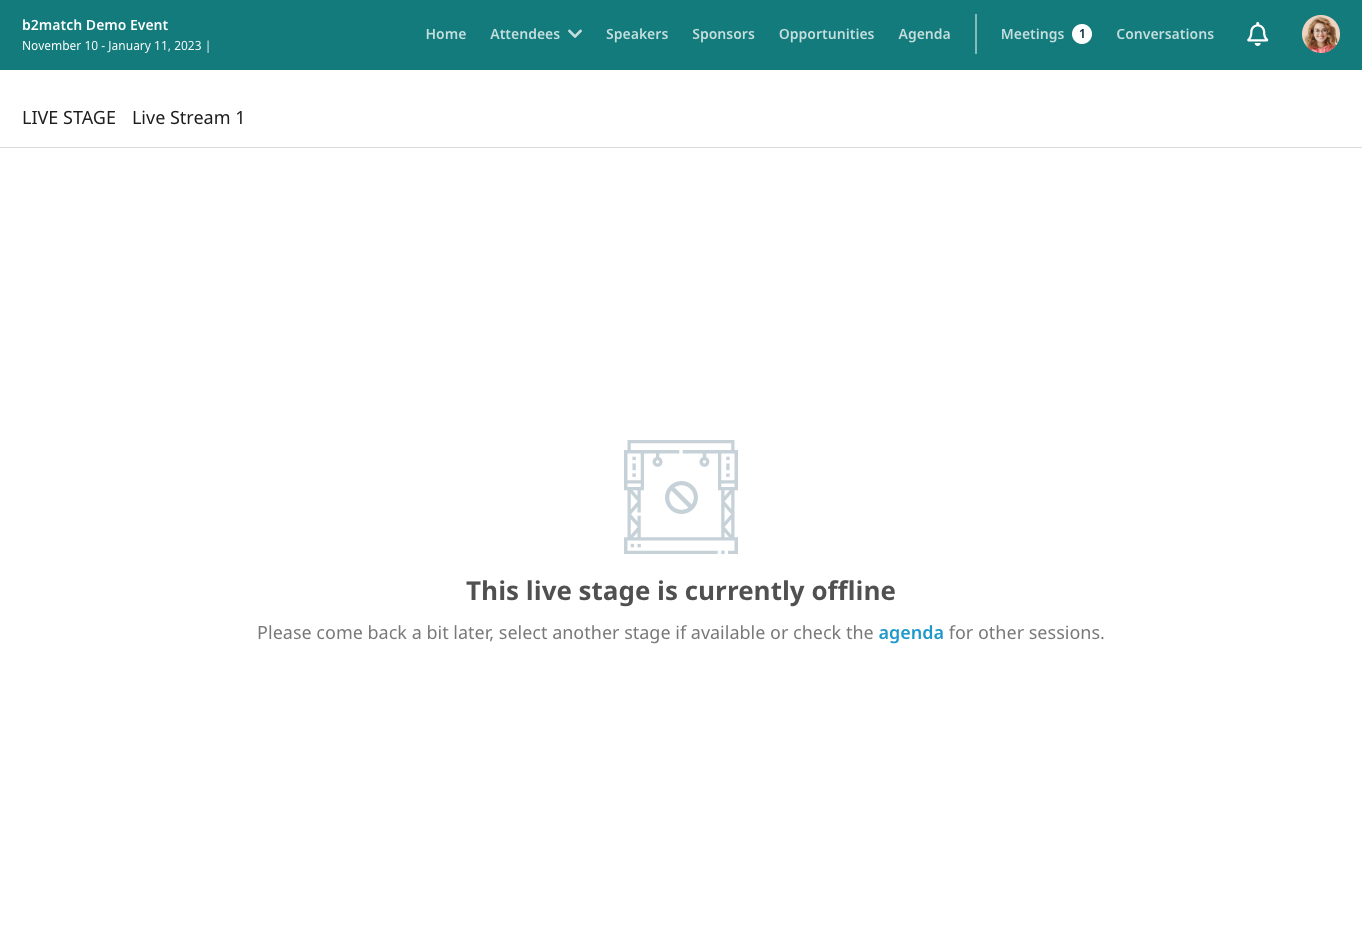
Once you start the live stream in your video conferencing tool or streaming provider, the label will say "Streaming in progress".
Depending on what tool you use, the RTMP URL and Stream Key will need to be entered in the settings of the video conferencing tool or streaming provider. A short guide for streaming via Zoom can be found later in this article.
Please note that starting and ending the stream, as well as configuring any stream related settings is done completely in the settings of the video conferencing tool you choose. b2match only serves as an intermediate that allows you to display the live stream.
For advanced users using a streaming provider such as Restream, here are some encoder settings for video quality that might be useful:
Common
-
Video CODEC - H.264 (Main Profile)
-
Audio CODEC - AAC
Great - 1080p 30fps
-
Bitrate - 5000 kbps
-
Keyframe Interval - 2 seconds
Good - 720p 30fps
-
Bitrate - 3500 kbps
-
Keyframe Interval - 2 seconds
Works - 480p 30fps
-
Bitrate - 1000 kbps
-
Keyframe Interval - 5 seconds
Live Streaming with Zoom
Please note that not all Zoom licenses have the streaming feature. Make sure to check your Zoom account to see if you can stream meetings to other sites.
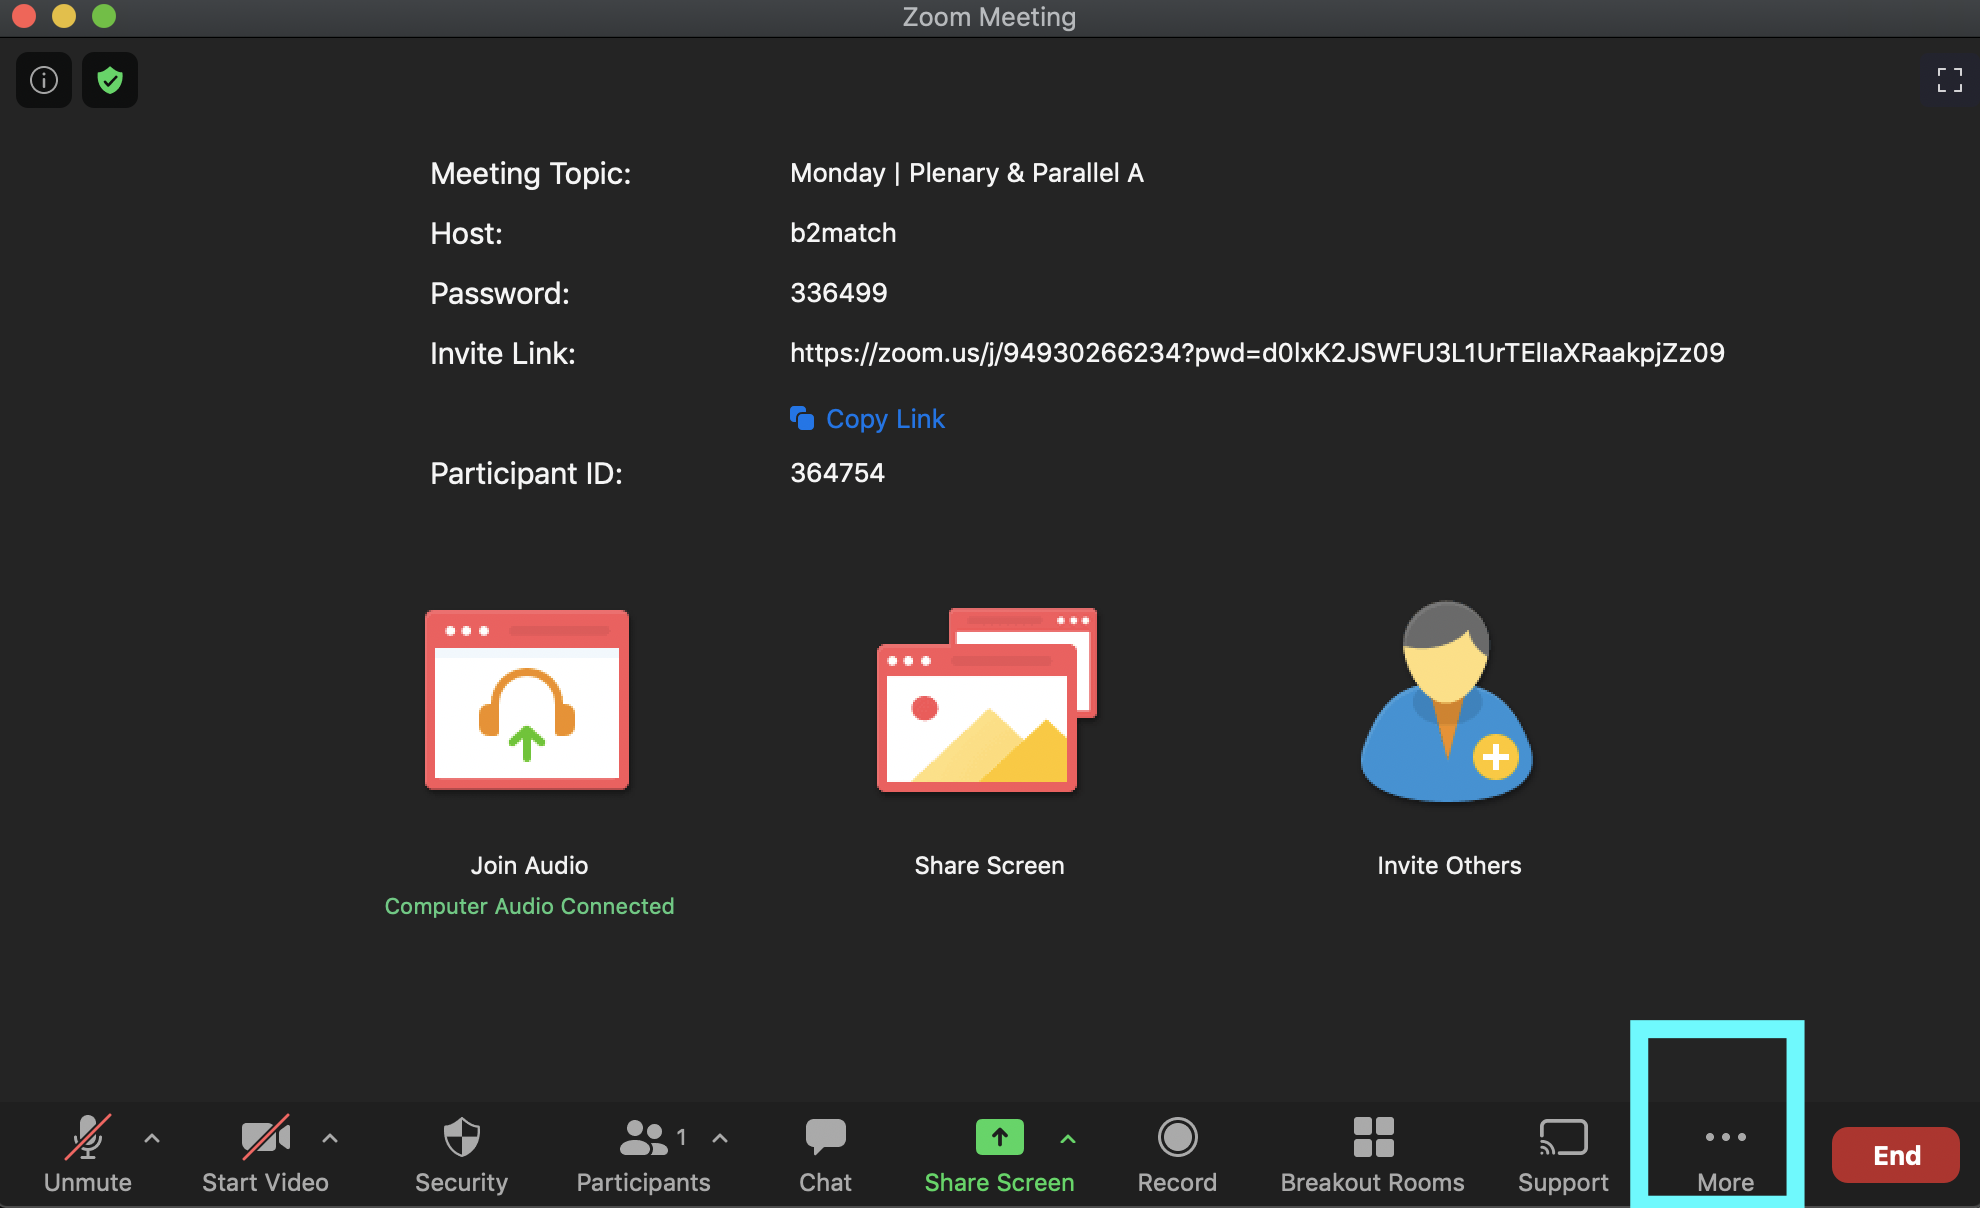
Start your Zoom meeting and go to More - Live on Custom Streaming Service
Copy & paste the streaming URL and the stream key from the organizer's tool - Agenda - Locations.
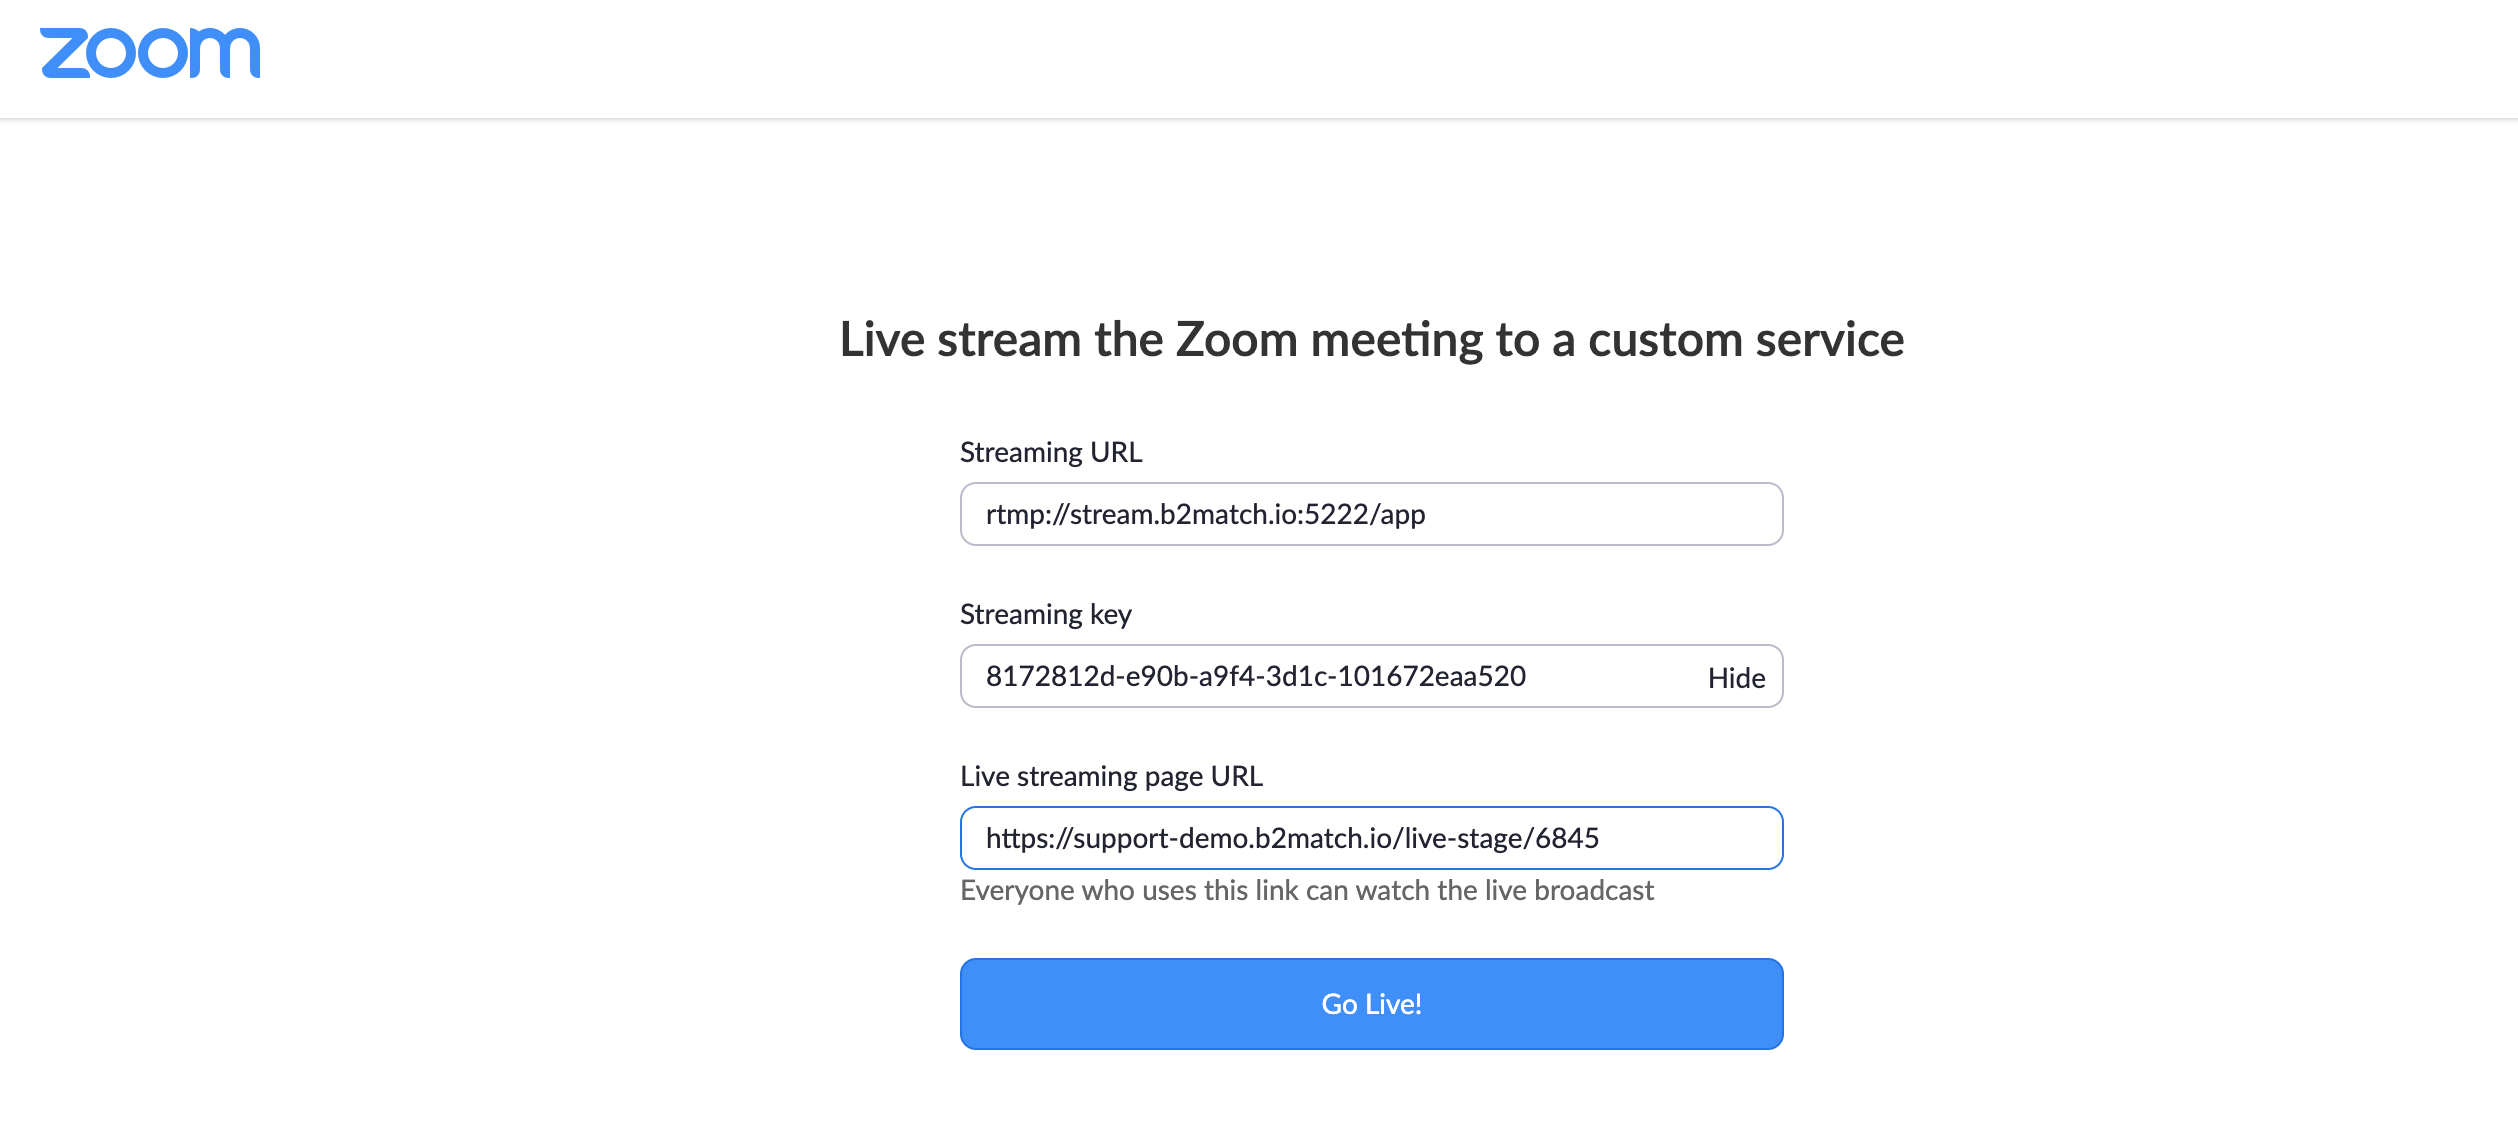
The streaming page URL is the URL of your live stage page.
Click the "Go Live!" button to start streaming.
You can set up a test session prior to the event, and invite your speakers and moderators to see how it will work.
The speakers and the moderators need to enter the Zoom room before the meeting.
The participants will access the live stage via their agenda or via the live stage page on the website, depending on how you configured your Live Stage.
Adding the Live Stage to the Event Website
After you create a live stage, it will not be shown anywhere by default. Instead, you will need to make the page visible to participants manually.
There are two ways you can add a Live Stage to your event website:
- creating a link in the navigation bar
- connecting the Live Stage to a session
Adding a Live Stage to the Event Navigation
To add a Live Stage to the event's navigation bar, go to Configuration > Event Navigation.

Click the "Add component" button in the upper right corner and select the Live Stage component.

Once you enter the name of the Live Stage, you will be able to choose whether you want to show all of the previously created live streams on this page, or just a specific one.

Please note that if you create a component that shows all the live streams, participants will have an additional dropdown menu on the page where they will be able to select which live stream they want to watch.

Additionally, you can configure visibility rules of this component.

You can make it visible only to certain participant types, or all of them, by checking the checkboxes. You can also make the Live Stage visible to non-registered participants (regular website visitors) if you want to make your stream available to the public by enabling the Guest Mode.
Once you configure the Live Stage component, make sure you click the "Create" button in the lower right corner.
Connecting a Live Stage with a session
To connect a Live Stage with a session you have previously created, go to Agenda > Sessions. Click the "Edit" button next to the session, and select the Live Stage from the Location dropdown.

When a Live Stage is connected to a session, participants will access it through the Join Online button on the session in the event Agenda.
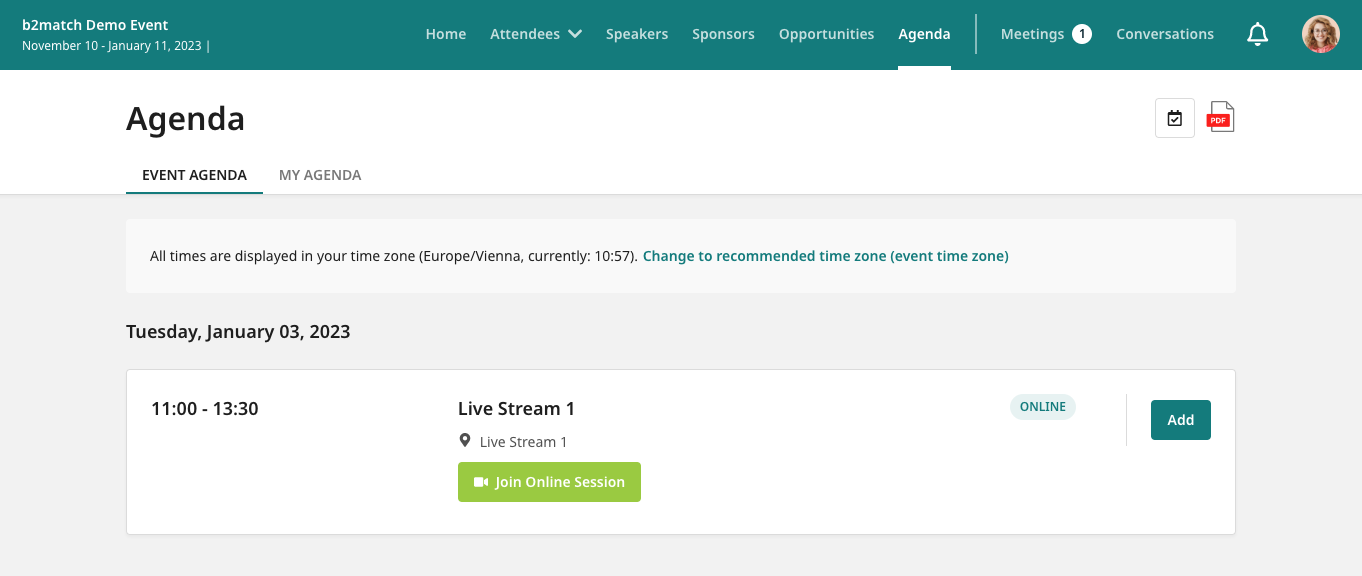
Please note that the "Join Online Session" button on the Agenda will only become active 10 minutes before the session starts.
Tracking Live Stage Visits
In case you connected a Live Stage with a session, you can get an insight into how many participants visited the Live Stage. To do so, you can download the Participant Data spreadsheet from the Export section.
Please note that it's only possible to track participants who visited a Live Stage by clicking the Join Online button on the Agenda session. If the participants accessed the Live Stage through the event navigation, we cannot track them.
Chat Panel
On the Live Stage, participants can communicate via the b2match chat. To enable it, turn on the toggle button in the Location edit form.

You can choose between the integrated b2match chat, or an external solution such as Slido or Mentimeter.
The integrated b2match chat is a simple chat tool that allows registered participants to communicate with each other, or to post questions for the speakers.

For an external tool, you will need to paste the appropriate link in the input field.

The link format for Slido is https://app.sli.do/event/xxxxxxxx, and for Mentimeter is https://www.menti.com/xxxxxxxxxx.
Once added, the external chat will be visible to the participants on the right.
