How can I access participant’s profile panel?
First, click on Participants on the left sidebar of the Organizer’s Tool.
This will open the participant’s list.
Select a participant to open their participant’s profile panel.

Participant's name and Contact Details
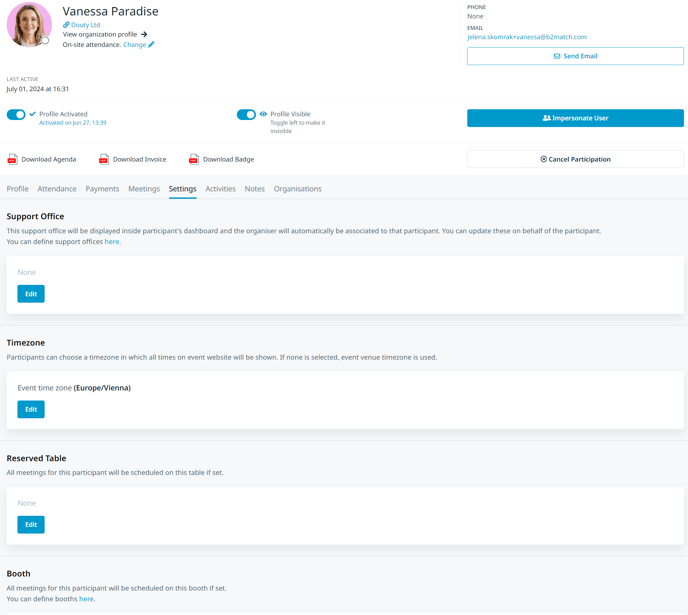
At the top of the participant's profile, you can see the participant's picture, organization's name, attendance type phone number and email address. These details are not editable by the organizer. For the profile picture, the system accepts the following formats: .jpeg, .png, .gif, .bmp, .tiff. The maximum size is 5 MB.

Additionally, the event organizer can change the attendance type on hybrid events, validate participants' profiles, and configure them to be visible to others.
The Impersonate User feature enables the organizer to sign in as a participant in the participant's dashboard and to perform actions on their behalf.

Downloadable documents and cancellation
In this section, you can find the downloadable documents and the participation rejection.
The Download Agenda button allows the organizer to download the participant's personalized agenda.
The Download Invoice allows the organizer to download the participant's invoice of the purchased ticket.
The Download Badge allows the download of the participant's badge, given that the Active button is ticked in Badges.

The event organizer is able to cancel participant's participation by clicking on the button Cancel participation.
Participant's profile panel menu
As an organizer, you are able to view and/or edit the information related to the participant profile, attendance, meetings, settings and activities. Also, you can leave notes, visible only to you and other organizers.

Profile
In the Profile tab you can view and edit the following information, which was added by the participants during registration or was imported by the organizer:
- Organization: You can add or remove the participant from an existing organization profile.
- Participant type
- Personal information (Job position and Phone)
- Speaker Settings
- Custom Questions
Attendance
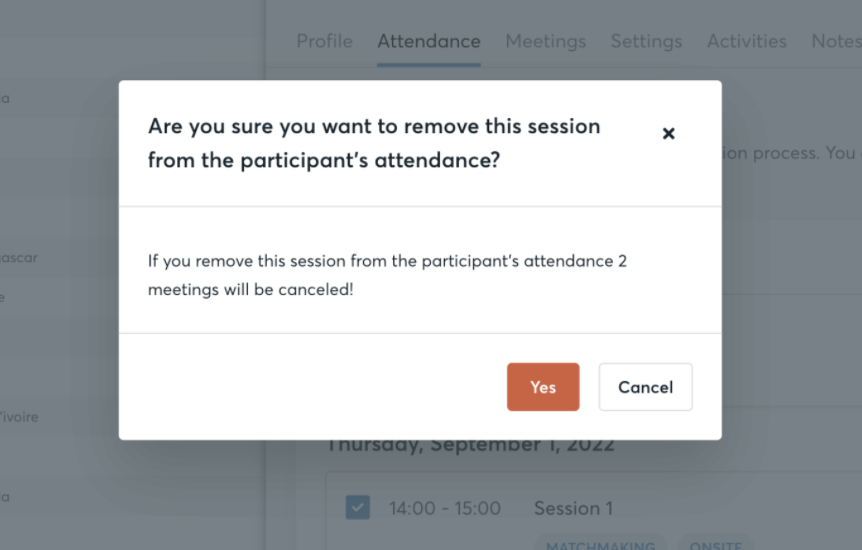
Here you can choose sessions on the participant's behalf by ticking checkbox in front of session's titles. All sessions can be picked by the organizer, even those that are not available to participants.

Warning: Removing a participant from sessions that have upcoming meeting will display a warning for the organizer. If confirmed, the participant's upcoming meetings will be canceled.
Payments
In the Payments tab, the organizer can view the status and details of tickets purchased by participants. If needed, the event organizer can add another ticket, refund, edit, or delete an existing one.

Meetings
In the Meetings tab, the organizer can view the list of the participant's meetings including their status, time and location.

Settings
In the Settings tab you can view and edit the following information:
- Support Office - the organizer can add and/or edit the participant's support office
- Timezone - the organizer can add/edit the participant's timezone in which all times on the event website will be shown. If none is selected, event venue timezone is used.
- Reserved Table - the organizer can reserve a table for the participant
- Booth - the organizer can assign the participant a booth
- Maximum Meetings - the organizer can set a number of maximum meetings for the participant
-
Available for messaging - the organizer can specify if this participant can receive messages from other participants.
Activities
The participant's history within your event is now available under Activities. This includes registration date, meeting requests, cancellation, check-ins and messages received from the organizers.

Notes
The organizers can leave notes, which will only be visible to themselves or to other co-organizers in the Organizer's tool.
Notes are not visible on the participant's profiles on the event website.

Organisations
The organizers can identify whether the participant is a member (referred to as representative) or guest of an organization (referred to as representation).
