Contents
In case the Payment add-on is not enabled on your event, please contact support@b2match.com.
Introduction
If you have the Payment add-on enabled for your event, you are able to configure tickets and charge your participants for attending the event.
There are several different ticket settings that allow you to create a wide array of tickets, including tickets for specific Participant Types and/or Attendance Types, tickets that allow access to specific Agenda sessions, tickets with an expiration date, and tickets that are available in a limited amount.
To find out more about how participants can pay for the tickets, check out our article How Participants Make Payments.
To learn about how you can add, remove, or change payments, and make refunds, read the article Adding and Editing Participant Payments.
To find out how participants can get payment confirmations, check out Invoices, Pro Forma Invoices, and Payment Confirmations.
Tickets
To start creating tickets, go to Configuration > Tickets. Here you will have an overview of all the tickets you create.

To create a new ticket, click on the Add Ticket button in the upper left corner.

Here, you can configure the ticket. On the left side, you can provide some basic information about the ticket, such as the ticket name, description, price, and limit, in case you can only sell a limited amount of tickets.

Try to come up with a short, but comprehensive ticket description, since it will be visible in the registration form. The information should be written clearly so that participants know exactly what they will get if they purchase the ticket.
Please note that the price of the ticket will be displayed in the default currency that you can select in the Payment Settings.
On the right, you are able to further configure the tickets with some additional settings.
With the toggle button at the top, you can show or hide the ticket in the registration form.

You can define the start and expiration date, which means that the ticket will only be available for purchase in that time period. For example, this can be used to create early bird tickets.

Please note that tickets that are not available yet will still be visible in the registration form. However, participants will not be able to select them.

If you want to hide the ticket before or after it goes on sale, please use the toggle button at the top.
Additionally, you can make the ticket available to only some Participant Types, or Attendance Types.

Please note that if there is a ticket available for a certain Participant Type, other Participant Types will not see the ticket in the registration form.
Finally, you can configure the tickets in such a way that it allows participants to access certain sessions. This allows you to create a wide range of different tickets with different levels of access.

When it comes to the sessions, be careful how you configure the tickets. If you select only one session, it means that the participant who bought this ticket can only attend that one session. Make sure to select all the sessions a participant can attend with the ticket.
When you're done with the ticket configuration, click the Add Ticket button at the bottom.
You will be redirected back to the Tickets overview. Once the registration starts, you will see how many participants bought a certain ticket. Additionally, you can rearrange the tickets on this screen with the drag and drop functionality.
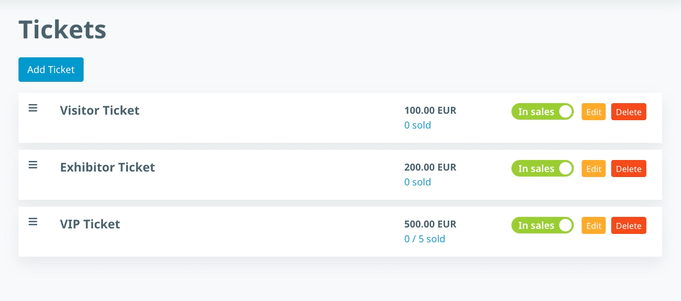
The order of the tickets in the organizer's tool will determine how the tickets are ordered in the registration form.
Promotion Codes
If you want to create some kind of a marketing campaign for your event, you can use the Promotion Codes to boost sales. You can set them up in Configuration > Promotion Codes.
Click the "Add promotion code" button to create a new one.
First, you need to provide the code itself. You can use letters, numbers, dashes ( - ), and underscores ( _ ). You cannot use any other types of characters, such as hashtags ( # ), currency signs ( $ ), punctuation marks ( !, ?, ... ). Then, you need to determine the exact amount or percentage that will be deducted from the total amount.

Please note that you can select only one of the two discount options.
You can also set up a limit, which will define how many times can a promotion code be used.
Additionally, you can define the start and end date, making the promotion code valid only during a specific time period.

If you want to give some participants access to the event for free, we recommend creating promotion codes rather than creating free tickets. This will avoid the participants’ tendency to choose free or lower-cost tickets and will give you more control over the payment process.
Please note that participants can apply their promotional code during the payment step. Check out the article How Participants Make Payments for more information.
Tickets as seen by participants
Participants select the tickets during the registration process. The selection is made after the participants select their Participant Type and Attendance Type (hybrid events only).

By default, participants can select only one ticket. However, you can disable the Single ticket selection option in the Payment Settings. When disabled, participants can select multiple different tickets.

Use this option if you have created multiple tickets that give participants different levels of access to certain sessions. For example, you can create two tickets - one that allows participants to attend matchmaking sessions, and one that allows them to attend workshops. Participants can then select both tickets, therefore getting access to both types of sessions.
Tickets that are not in sale yet are visible to participants, but cannot be selected.
Please note that participants can pay for the ticket at the Payment step. For more information, please check our article How Participants Make Payments.
Managing Tickets & Promotion Codes
As the event organizer, you are able to add and change tickets on behalf of the participants. To do so, go to the Participant list, select the participant whose ticket you want to add or change, and click the Payments tab.

In case there are no payments yet, click the "Add Payment" button. This will open the "New payment" screen.

At the top of the screen, you can define the payment status of the ticket you will add. If the payment status is "Pending", the participant will have to make the payment. To learn more about how participants can pay for tickets, please read our article How Participants Make Payments.
Below the Payment status section, you will find the billing information. This information will be used for the invoice which will automatically be generated for the participant after they make the payment.
To add the actual ticket and the promotion code, scroll down until you get to the ticket section.

Click the "Add Ticket" button. You will be able to select any ticket you have previously created.

If a ticket is configured for another participant type, you will see the orange warning symbol. However, you can override this rule as the organizer and still add this ticket. In case there is a limited amount of tickets, it will be indicated in the dropdown.
You cannot add a ticket if its limit has been reached, it has expired, or hasn't started yet.
Once you add a ticket, you will also be able to add one of the Promotion codes you have previously created.

After you make the changes, click the Save button at the bottom.
You cannot add a promotion code if its limit has been reached, it has expired, or hasn't started yet.
In case a ticket was already added to the participant, or the participant selected a ticket themselves in the registration tool, you can change it in the organizer's tool by clicking the "Edit Payment" button.

You cannot change an existing ticket or promotion code if the payment status if the participant already made a payment, or the payment was refunded. If a participant purchased the wrong ticket, please read about Adding and Editing Participant Payment.